Welcome to Week 2 on the 2D format games project. Previously, I started working on a top-down 2D game where the player controls a tank, and their objective is to destroy all of the enemy tanks on the map to move on to the next level or win the game. Last week on the project, I developed the tilemap of the level that features destructible walls, movement on the player tank and turret, and the enemy and considered the UI design for the game with the assets made and placed into the game.
This week’s project goal was to finish the game’s basic mechanics by getting the shooting mechanic implemented in the game, a fuel mechanic added to the player tank. Later in the week will also see adding in different types of enemies to the game and the UI change animation based on how much health or fuel the player currently has. The first thing I started was to finish up the basic mechanic by implementing the shooting mechanic into the project. In one of my previous projects back, I developed a 2D prototype; I successfully managed to get this mechanic working to the game without any challenges by understanding how the create a bullet group and how the bullet will travel. However, this project’s design for the bullets is different since they need to be fired in any angle direction in the game world due to the top-down gameplay. To do this, I made sure that “bullet.rotation” (Figure 1) had no value presented next to this as this would allow the bullet to travel in direction based on the direction the tank turret is facing and still use the same logic I used previously.

The code on the bullet has been expanded where visual feedback to the bullet, such as an explosion animation, is triggered to play whenever it collides with something. For example, in the above code (Figure 1), we have a method called “bulletHitPlayer”. Whenever a bullet from the enemy hits the player, it will play the explosion animation in the code based on the player’s tank hull location. This works very well because it can bring immersion to the game experience, and I would like to look further into this, such as having dirt animation being played from the back of the tank whenever a tank is moving in the game.
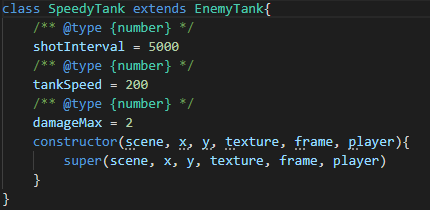
Different enemy types were the next part of working on the project after implementing the core mechanic in the games. The first enemy type was a boss tank (Figure 2), which functions by having more health value known as “damageMax”. A slower movement speed is referred to as “tankSpeed”, and adjustment is made to “shotInterval”. “shotInterval” refers to how often that type of tank can fire and with the current value set with the boss tank, it is more likely to fire often. The lower this value is, the harder it is to combat against specific tank types. A unique design is used to show that the tank is a boss tank (Figure 3) to help identify it quickly.


I then further explored adding more types of enemies later by having a tank that moves faster than other tanks in the game (Figure 4) but has much lower health and firing less often to the player. This tank type also used a different design where I applied a light blue to the tank hull and turret because I can see blue being a colour that symbolises speed during the gameplay (Figure 5). After experimenting with tank classes with this project, I would like to expand this later, but having tanks that shoot different bullets that do more damage to the player or spread of bullets around the game world. This would enhance the various strategies that the player would need to use to combat the types of different tanks in the game.

The next thing I worked on the project was carrying on the fuel mechanic where previously, I had the condition set to changing the speed of the player tank when their fuel reaches “0” and adjusting their movement speed. This week was to start getting the fuel value to keep going down during the overall gameplay but decreasing the value whenever a timer has passed. The implements made around this was done by (Figure 6) checking if the player fuel is greater or equal to 1, whether the player damage count is less than 12 and if “usedFuel” is set to true. If all these conditions are met, the player fuel decreases by one and sets “usedFuel” to false. However, a timeout is also used at the end of the code, where after one second, this will set the “usedFuel” back to true to effective keep the loop around-consuming fuel. While this works very well for the gameplay, I would like to see the idea expanded further by checking if the player is moving and then start to consume as I feel like this idea could work more effectively to the fuel mechanic to the game.

Above the fuel mechanic code are if statements that check if the player “damageCount” is less than 0 and “currentFuel” is greater than 100. These are used to set a maximum cap of how much health and fuel players can have during the game. These caps values will allow the ability to have items in the game to reward higher value of health and fuel to the player during the game.
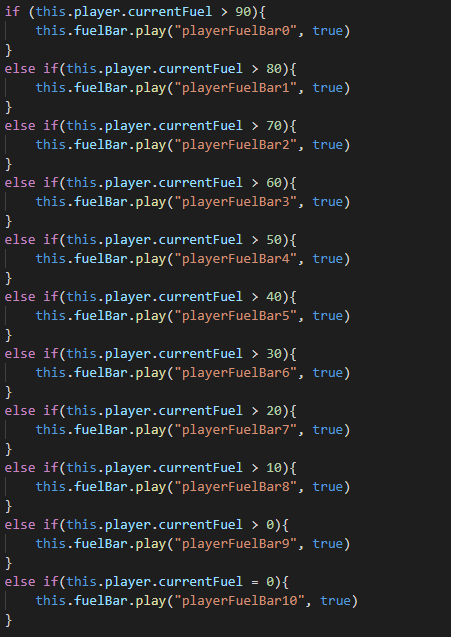
Lastly, several UI changes have been made compared to the previous week (Figure 7), where the tank counter text has been changed by using a bitmap font instead of using a simple font style. This change has benefitted the project because the bitmap font can help to match the tank theme to the UI. The fuel bar UI had to be ultimately changed to the project because to get the animation for the UI to work; I had to resort to creating separate animation frames to play. This approach had resorted to many lines of code (Figure 8) to be added to the project, and while these methods work fine, it is not coded efficiently. I believe that a way exists to reduce the amount of code to the project for the UI animation. If I had used the original fuel bar design, this would have resorted to creating over 30 frames in the code.

Overall, the project has turned out very well. I want to explore what I mentioned this week to create a more efficient code for the project, more complex types of tanks, and more immersive animation. You can play the game by clicking the LINK.