Welcome to week 6 of the Indie Development Project. Previously, I had explored using Unreal Engine 5 to experiment with the new version to help in the future when I later transferred to after this project. During my experiment, I had a go toward creating landscape and setting complex collisions with a mesh and then testing these out by exploring the world.
This week saw the start of the project by first using the concept of the level design and creating the landscape by using the skills taught before.


From how the level (Figure 2) turned out from following the concept (Figure 1), I feel that the level overall turned very accurately to the original concept layout. However, it was a matter of imagining what I wanted each ruin layout to be like. With what I did with each area, I made where the first area allows the player to get used to the controls so that they are prepared to take on the next area onward. With areas 2 and 3, I designed them to test the player’s skills, with the 2nd focused on jumping and then the 3rd more on shooting. The reason to do this is to test the player’s skills in specific areas, and if the player managed to collect the treasure and all coins in the area, they would master those mechanics of the game.
Regarding the game’s assets, I went with collecting assets in the Epic Games asset store because I wanted to focus area on the game’s development by creating and improving previous mechanics made and building the level. With all the premade assets available straight away, I could save more time in getting the area built faster.
The next part was getting the implementation of the collectable coins and treasure.
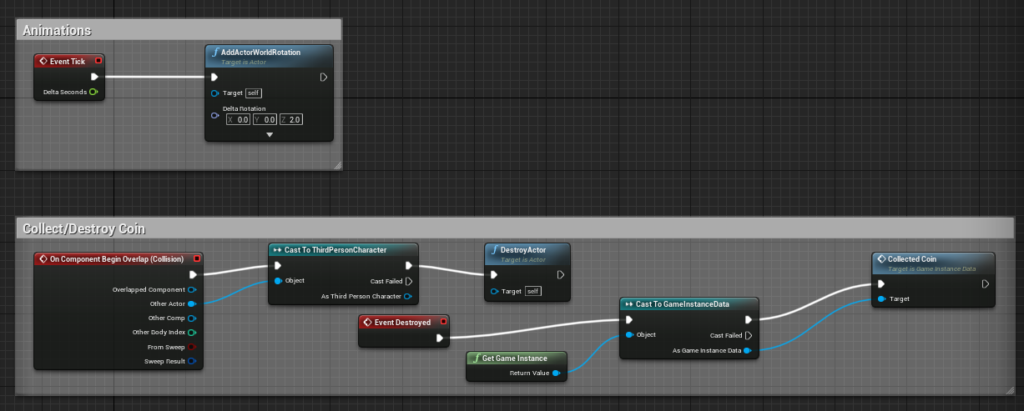
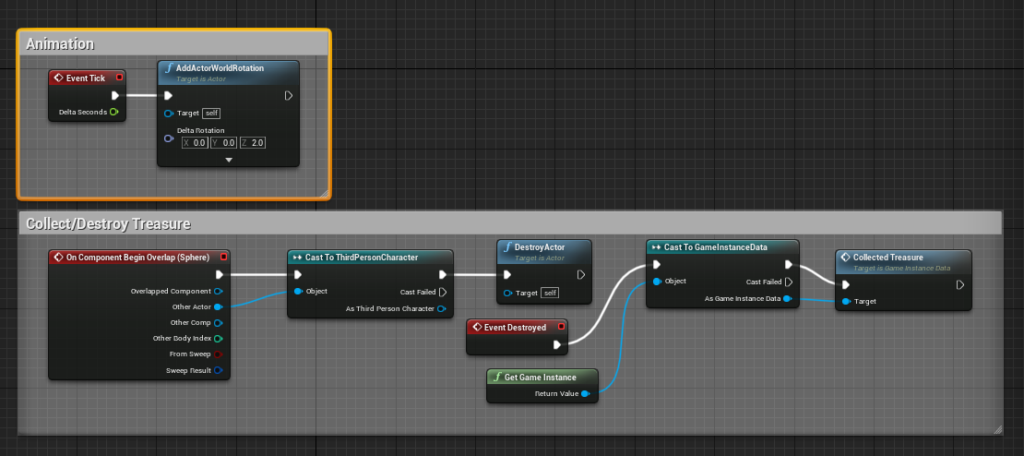
In creating the blueprint for the coins (Figure 3) and treasures (Figure 4), I used a previous blueprint design I had made when testing a collectable coin in a test project test collectable items. I used this approach to develop the game because this would save me time to help improve other key areas of the game. These areas included the shooting mechanics and User Interface. When both items are collected, they are destroyed. Then a custom event is triggered in a separate blueprint called “GameInstanceData”, which is used to store all types in variable values for the game.

The “GameInstanceData” is a similar blueprint I used in my test project. Still, the difference here is that I decided to use this blueprint to store all value variables of integers and floats. These include coins, treasures and the player’s stamina. Two new additions to the blueprint include introducing a score value and max stamina. The score value works because whenever the player collects either a coin or treasure, they increase the player’s score by 10 and 100. This decision was made to give the items another purpose where the coins act as consumables to allow the player to open doors to collect treasures, which will upgrade the players’ stamina. This sense of purpose can motivate the player to get the highest score possible in the game while also giving the items more than one usage.
With the main collectable working, I next look at implementing the first key area, the character abilities. This was done by building upon the third character blueprint provided in the project default. Using the blueprint, I added mechanics for sprinting and shooting by using the same idea developed in the test project and improving them.
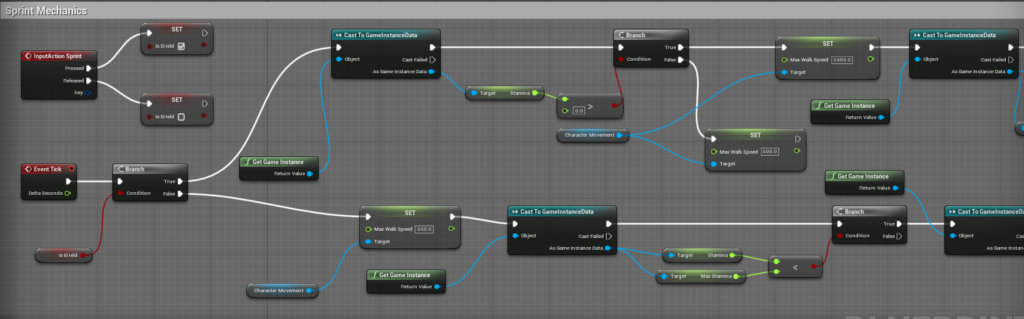
The improvement made from these two blueprints is that with sprinting (Figure 6), I added in a regeneration effect where whenever the player is not holding down the left shift key in the game, the player would regain stamina until they are equal to the max stamina value. This improvement to the sprint mechanic works very well because this allows for introducing an upgrade system for the player and a resource that the player can spend during the game and gain back.
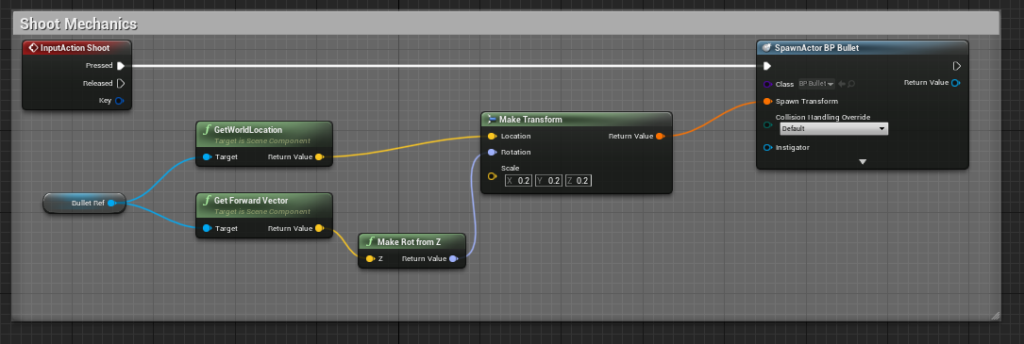
The shooting mechanics (Figure 7) were further improved by giving a reference area of where the bullets would shoot from and adding a component toward the bullet blueprint that gives it projectile movement.
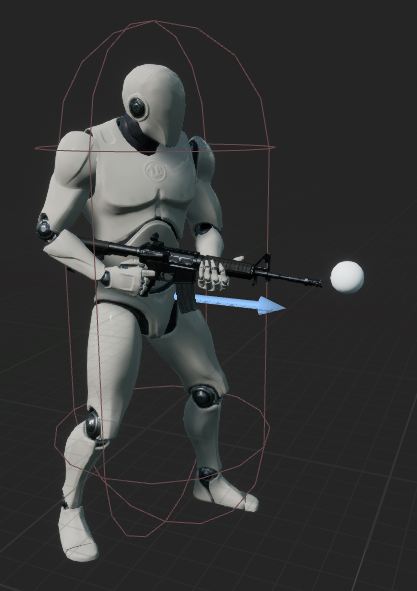
On the far end of the gun (Figure 8) is a sphere, which acts as a reference to where to spawn a bullet whenever the player presses the “F” key in the game. When pressed, the bullet will travel directly forward from the reference until either the bullet hits a box in the game or after some time has passed while travelling. One side effect is that the bullet can travel through a wall, but I like this idea because it gives it a penetrating effect and could be used to destroy boxes from the other side.
With the core player mechanics made, the next key area to focus on was the user interface by displaying how many items, and scores the player has and giving prompts when the player can perform specific actions like pressing switches in the game.
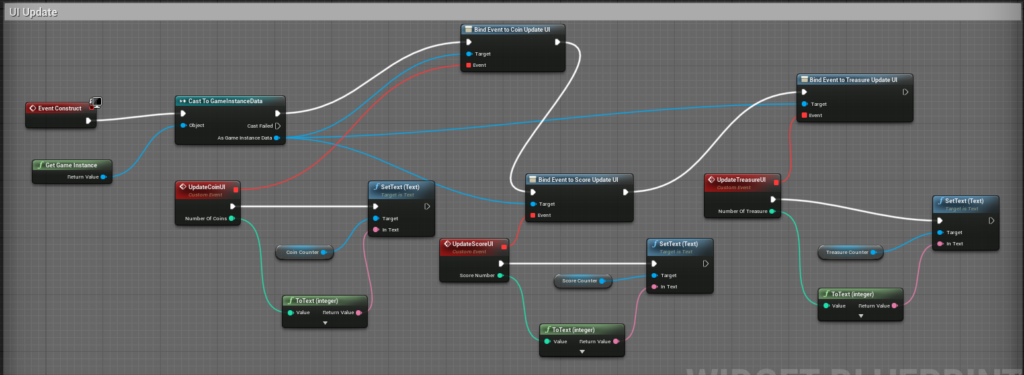

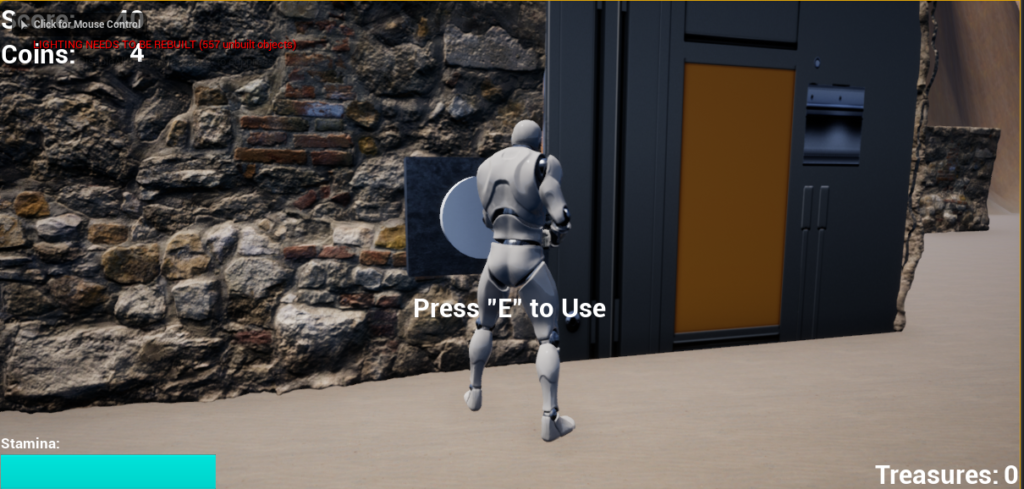
Using the skills from creating a Widget blueprint in the test project, I used the previous idea by expanding on the number of collectables (Figure 9) the players have in the game and adding text prompts (Figure 10) to the game. The text prompts work because when the player is in collision with a switch, they are given a prompt to “Press “E” to Use”. If the player press “E”, they may be given a prompt to collect more coins to use the switch or the door may open and consume the coins and make all text prompt disappear. “Press “E” to Use” also disappear if the player leaves the collision box. These prompts all work by using the switch blueprint and getting the custom event called out from the UI blueprint. I implemented these prompts because they inform the player that they can press the key to perform the specific action whenever they need to. An example of the UI can be seen below.
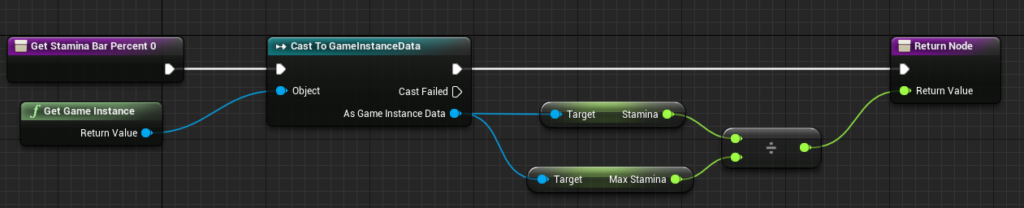
With how I got the stamina UI bar to work in the game, I had to bind the bar to create a function around it. Then I needed to get the variable of “Stamina” and “Max Stamina” from the “GameInstanceData” blueprint and divide them and return the value back to the bar. I went with the colour blue with stamina because blue tends to associate with stamina in games as speed.
With the key area of the game’s development finished, I wanted to next focus on implementing the doors and switches to the game as well as using the previous mechanics created such as jump pad, destructible boxes that spawn coins and switching to another character in the game. Not much has changed around these mechanics from the test project, so I wanted to focus attention on the doors and switches shown below.
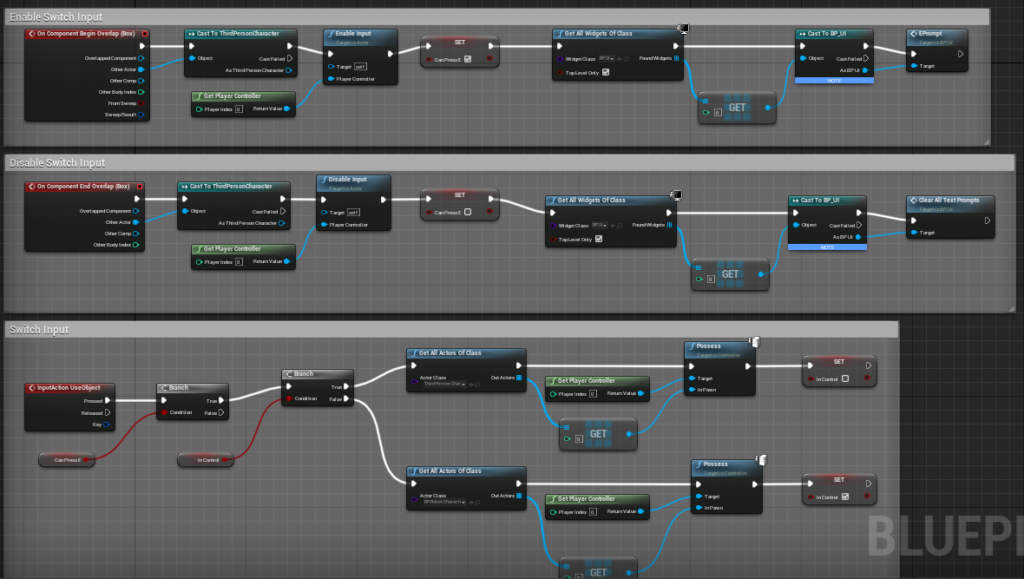
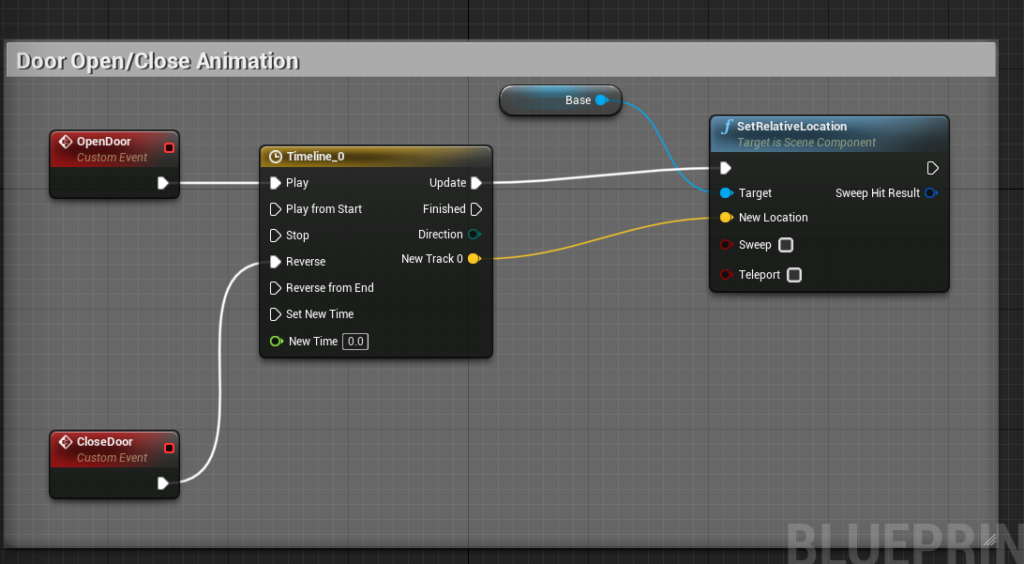
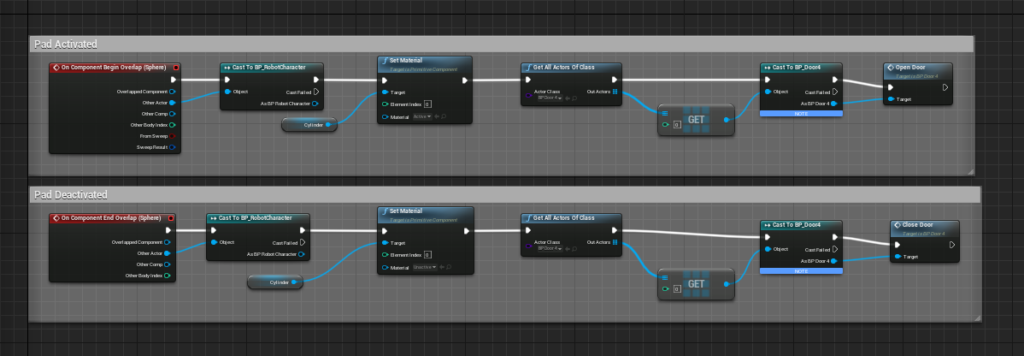
In the switch blueprint (Figure 13), when the player enters the collision box, they are able to press “E” to operate the switch. Early on, I mentioned that some switches could open doors by having the correct amount of coins in the game; however, there is a switch in the game that allows the player to take control of another character in the game. The purpose of switching the character is to solve a puzzle by standing on a pressure pad within the contained area that the character is in to allow to open a door while on the pad. The door closes if the character leaves the pad (Figure 15). The door uses animation with its own blueprint (Figure 14) that is called on when the custom event of either opening or closing is called on. Depending on what is called on, it will either reverse the animation timeline or forward it. I wanted to create this area, shown below, to give a small puzzle section for the player to solve in the game while preventing the other character from escaping.

With the progress that has been made to the game so far, I feel achieving the main 2 key areas this week was important as this would allow me more time to make further polishment to the games, such as using lighting and adding some particles effects if there is time. However, before I can do this, I need next need to implement the main menu and end screen and add in the target switches to shoot from using the idea in the test project.